


Owning a vehicle comes with the responsibility of understanding some of the basics for being on the road. Whether you're a seasoned driver or a novice, knowing these fundamentals can prove invaluable. In this article, we'll cover five essential vehicle skills that every driver should be familiar with.
What 5 Skills Should Every Driver Know?
- How to properly boost a car battery
- How to properly jack a vehicle
- How to remove wheel lock nuts
- How to check engine oil levels (and add the correct oil if need be)
- How to replace your windshield wipers
How to Boost a Car Battery
One of the most common and frustrating experiences for drivers is a dead car battery. However, knowing how to jump-start your vehicle can save you from being stranded. Here's a step-by-step guide:
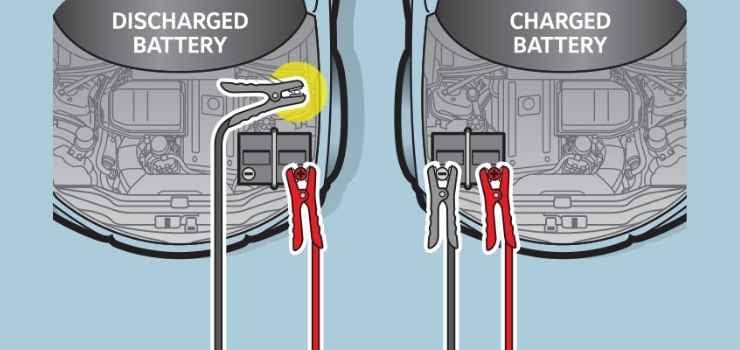
- Position the vehicles: Park the booster car next to the vehicle with the dead battery, ensuring they don't touch each other. You can leave the booster vehicle running.
- Identify the battery terminals: Locate the positive (+) and negative (-) terminals on both batteries. The positive terminal may or may not have a protective red cover overtop of the terminals.
- Connect the jumper cables: Attach one end of the red (positive) jumper cable to the positive terminal of the dead battery and the other end to the positive terminal of the booster car. Next, connect the black (negative) jumper cable to the negative terminal of the booster car and the other end to a bare metal surface of the dead car (e.g., a bolt or bracket). If there is no bare metal available, you can attach the cable to the negative battery terminal.
- Start the dead car: Attempt to start the vehicle with the dead battery.
- Disconnect the cables: Once the dead car starts, remove the jumper cables in the reverse order they were connected.
*If the vehicle does not start, additional service may be required.
How to Jack Up a Vehicle
Knowing how to safely jack up your vehicle is essential for changing a flat tire or performing basic maintenance. Follow these steps to do it correctly:
- Find a flat surface: Move your car to a level and solid surface to ensure stability.
- Use the proper Jack and tools: Locate the designated jacking points on your vehicle and use a compatible car jack and wrench. The jacking points for your vehicle can be found in your owners manual or through a quick online search.
- Loosen lug nuts: If you’re working going to be changing a tire or working behind the tire, you’ll need to loosen the lug nuts on the wheel you intend to work on. This should be done before jacking up the vehicle.
- Block/chock the wheels: before you jack the vehicle up, you’ll need to add a block to the other wheels. They do make small easily transportable wheel chocks, but a block of wood will do just fine.
- Position the jack: Place the jack under the jacking point and ensure you have good contact with the jacking point.
- Raise the vehicle: Once the jack is in position, you can raise the jack with the provided pump, crank, or other equipment. Ensure you have enough room to safely work.
- Change the tire or perform maintenance: Now you can safely change the tire or perform any necessary maintenance.
- Lower the vehicle: Once the tire has been re-attached or the maintenance is complete, you can slowly lower the vehicle back to the ground with the crank or release on the jack.
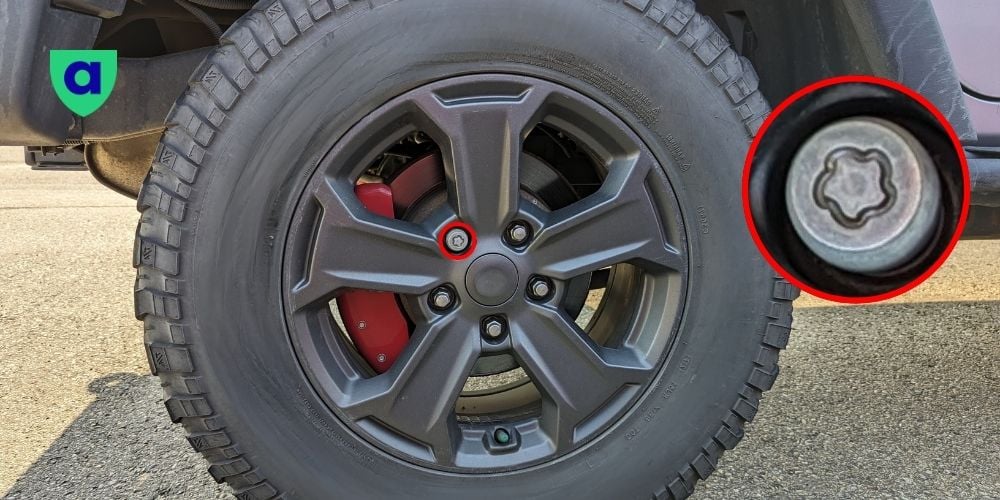
How to Remove Wheel Lock Nuts
Wheel lock nuts provide an extra layer of security to protect your wheels from theft. If you’re getting work done on your vehicle where you need to remove the wheels, it is a good idea to have the wheel lock key in an easy to find area. Actually, removing a lock nut is fairly simple, here’s how to do it.
- Locate the key: Find the wheel lock key in the vehicle. It will usually be with the spare tire, in the glovebox, or in a vehicle’s emergency kit.
- Place the key on the nut: Fit the key securely onto the wheel lock nut.
- Loosen the lock nut: Use a lug wrench or a breaker bar with the wheel lock key to turn it counterclockwise and loosen the nut.
- Remove the wheel lock nut: Once loosened, use your fingers to twist off the nut and set it aside.
*If you lose or break a wheel lock key, you may need to seek out professional help. In some cases, tire shops or the original dealership may have a spare wheel lock key available.
How to Check and Add the Correct Oil
Engine oil is vital for your vehicle to function properly. Regular checks and changes can help keep your vehicle running in tip-top condition. Follow these steps to check your engine oil:
- Check the oil level: Park your vehicle on level ground and turn off the engine. Locate the oil dipstick, usually a bright yellow or orange in colour, and pull it out. Wipe the dipstick clean, reinsert it fully, and pull it out again. Check the oil level; it should be between the minimum and maximum marks.
- Low oil level: If your vehicle has a level below the minimum line, you will need to add oil. When topping up oil, add a small amount of oil at a time. Running on too little oil could cause damage to the components.
- High oil level: If your oil level is too high, you may need to remove it from the vehicle. Using an oil catch can and an appropriate wrench or socket to remove the drain plug underneath the vehicle, you can remove some excess oil and quickly reinstall the drain plug (this will likely be messy). Having too much oil in a vehicle can blow through seals in a vehicle, causing significant damage.
- How to add the right oil: If your oil type is not written on the oil cap, you can check in your owner’s manual. For some new vehicles, it is a good idea to talk with someone at your local automotive store to ensure you get the correct oil type.
How to Replace a Windshield Wiper
Windshield wipers are an important safety feature for your vehicle and should be replaced every 12-18 months. It is important to know how to change a wiper blade as they can break off or fly off without warning leaving you with no other options. Here is a few short steps on how to replace most wiper blades (some vehicles will have different installation instructions).
- Remove the old wiper blade: On the underside of the wiper arm, you may find a small release tab that must be pressed to release the wiper blade. This will unlock the blade and allow the blade to slide off of the metal hook.
- Install the new wiper blade: Align the new wiper blade's hook-shaped end with the wiper arm's connection point. Slide the wiper blade onto the wiper arm until you hear a clicking sound or feel it lock into place. Ensure it is securely attached. Your wiper blade may have a clip that goes overtop of the where the wiper arm secures.
Wiper blades should be replaced in pairs if possible.
Conclusion
Having these five vehicle skills will help you be prepared for extenuating circumstances while on the road. Remember always to prioritize safety and never hesitate to seek professional assistance when necessary. Understanding the basics can help you when you're in pinch.
If you need help with your auto insurance, we're here to help. Give us a call today.